I have been steadily trying to get a bunch of Mellotrons done and out of
the shop. Rather than post everything that is going on, I think that it is
only worthwhile (and perhaps marginally entertaining) if I put up photos and
comments about the more challenging ones. This Mellotron is the 2nd one
I've done since the "Blue Mellotron." I'm not particularly fast these days
because I've been working harder than ever at trying to keep my regular
business afloat and at the same time, getting my house ready to sell. Soon I will
be moving to a new place out in the countryside with a stand alone shop in
its own building.
So here is #885/674. Yes, two Mellotrons butchered to make one. When it
came into the shop the floor was rotted out and the right side of the cabinet
was split front to back about 6 inches up from the bottom. The whole
cabinet was coming apart at the seems. This one also had the worst keyboard I
have ever seen. There were son many keys with compound warps that I wasn't
sure how to get they straight and make them stay that way. Eventually I ended
up using a technique that it very risky but it worked and I was able to get
the keys straight.
Here are a few before and after photos for those that can view them. I'll
put a whole series up on the home page later tonight or tomorrow. If you
right click and save these they are in much better resolution
This one hides many dark secrets. It is hard to see the warps in the keys
but they were so bad that keys were stuck together.
Notice the missing fuse? It's duct taped inside the power supply. Sweet!
Pretty much like most I get. Complete with 30 year old dirt and stuff
spilled all through it.
It not only needed cleaning, but a thorough disinfecting before I could do
much.
This was the solution to keeping the floor together. Then it got dropped
and slit the side.
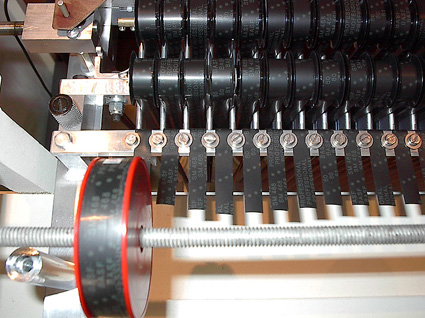
Testing the rebuilt machine
I later ended up repainting the wood for the control panel.
Fitting out the cabinet. The owner did not want the outside painted.
The basement.
This one had to be rewired from the control box to the power supply. Lots
of burned wiring and the WME 289 & 290 were burned up.
Ready for delivery.
Ready to go home with its owner. Look how excited he is.
This is my shop
It is like a big "L"
4 work tables
This one is where I spend the most time. Solovox in the background
The wood "rack" speeds things up and is a great place to lace tapes into a
frame.Message
Re: another crappy Mellotron
2010-03-25 by lsf5275@aol.com
Attachments
- No local attachments were found for this message.